 | Cad Crowd")
This article will share architectural services firms’ workflow for exterior 3D rendering. Skyscrapers, stadiums, and suspension bridges are just a few examples of modern civil engineering marvels. Each time you see one of those, it is hard not to wonder how the architects and engineers have built such an impressive feat and made it last. You have no worries about whether the construction will collapse, despite the mounting traffic when driving on a suspension bridge of almost impossible height and length. There is no sense that the structure is unsafe when standing on the top floor of a skyscraper, despite the strong wind and narrow width-to-height ratio. How much effort would it take to ensure that every detail was correct and avoid mistakes during construction? The short answer is: monumental. Compared to the works of architects in the olden days, it’s easier now, thanks to technologies like CAD and 3D visualization.
🚀 In this article
The good thing is that the technologies are accessible to those in the civil engineering industry and ordinary homeowners looking to build and renovate their houses. With an exterior 3D rendering, everyone can see how a house should look long before construction begins. The same technology helps general contractors understand clients’ perspectives to draft a more comprehensive plan to manage the project more efficiently.
RELATED: Learn about the types of architectural rendering services available for your company
3D rendering basics
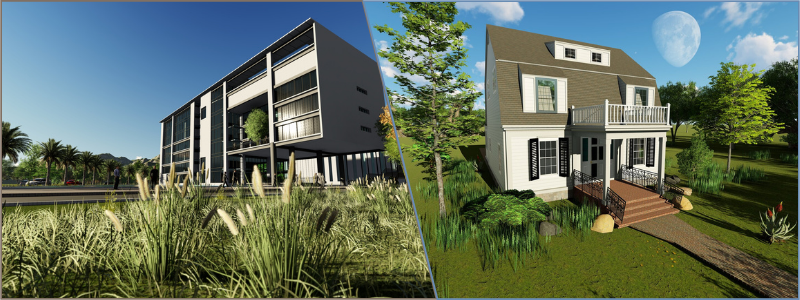
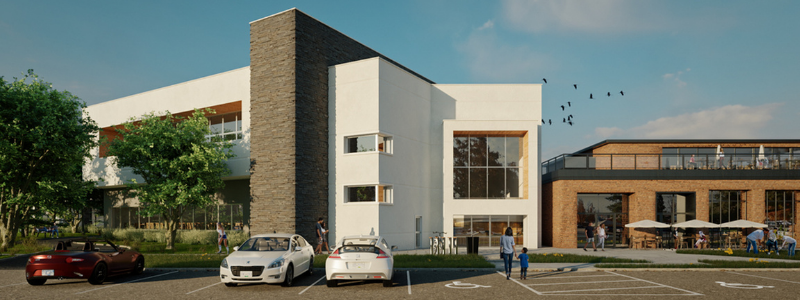
The final product of an exterior 3D rendering service is a photorealistic CGI (computer-generated image) of the externals of a building, whether residential or commercial. Photorealistic rendering is called CGI because every detail you see in the image is drawn on a computer. A 3D visualization is usually (although not always) based on an actual building or a well-educated guess of a hypothetical one.
Unlike a blueprint, an exterior 3D rendering focuses on the cosmetic aspect—as opposed to technical details—of a building. It contains less information about a structure’s underpinning, room layout, functionality, and interior features. The main objective is to showcase the external shell of a structure, often accompanied by its surrounding environment. When used as part of a project plan, for example, in a marketing campaign, photorealistic rendering helps buyers see what they get for their money. At the same time, a 3D visualization represents the architect’s idea of what the building should be.

Though it is a hypothetical photograph, an exterior rendering is much more than an imaginary object. It is an architectural point of reference based on which architects determine and calculate a construction plan. Their goal is to build a structure identical to the rendered image. They must implement a system to improve the chances of materializing the visage, which means developing a viable concept of an internal structure that supports and complements the building’s external components.
RELATED: Learn about architectural design fee schedules, rates, and pricing for architect firms’ costs
Why it matters
An architectural project is a long and complex process, and it is also expensive, depending on the scope of work involved. Nobody wants to waste time and money with a sloppy plan, whether a small-scale project like a bathroom renovation or a large-scale undertaking such as a new multi-story car park. Even if you have the budget to fund the same task repeatedly, you want it done the first time correctly. There can be no room for mistakes; otherwise, the endeavor is nothing but a fool’s errand.
An exterior 3D rendering is not a fictional image. A 3D rendering artist takes the existing sketches and blueprints as the base model, and a well-made rendering is accurate to the dimension and specifications stated in the source documents. It also incorporates superficial details, including colors, textures, and materials. To make the image even more lifelike, the artist may add natural lighting and position the image at a particular viewing angle to mimic a photograph captured by a high-resolution camera, if not better.
A lifelike digital project depiction allows the architect to adjust to the construction process more easily and quickly on a computer. An accurate model also enables the project leaders to envision how to manage the work, divide the job into multiple goal-oriented tasks, assemble competent teams for speedy development, and determine a reasonable timeline. Everyone involved in the project carries out their respective duties to meet the architect’s deliverables, set beforehand in compliance with the parameters shown in the render. Project development flows easily with adequate progression, not a mistake-ridden, ill-defined task.
RELATED: 3D rendering: what it is and why you should care
Exterior 3D visualization workflow
There isn’t a standard workflow for exterior rendering. That said, nearly all rendering companies employ the same sequential milestones.
1. Brief Project submission
Before a photorealistic rendering task can begin, the render artist and the client discuss the project brief. The client provides as much data as possible, including, but not limited to:
2. Architectural drawings
To understand the general concept of a building, a render artist needs to study some basic architectural drawings, for example, site plans, floor plans, cross-sections, and elevation. A site plan is more relevant to the task of exterior rendering as it shows the exact boundaries of the properties or the position of the building on a plot of land. The artist and the client also need to agree on the file formats for the drawings. The more drawings the client can provide, the more details the artist can explore.

3. Lighting reference
One of the most significant advantages of a 3D visualization service is the capacity to generate every possible lighting condition for the image. You can ask for nighttime rendering with the moon and stars as the only natural light sources; that is not probably the right thing to do in most cases, but the option is available. Regardless of your preferences, the brief must include clear information about the lighting scenario, whether bright, dark, or dim. You must take the viewing angles and direction into account too. The brief may include a picture of another building as a mere sample.
RELATED: Types of 3D visualization for architectural design and CGI projects
4. Sketches
Depending on the intended use of the 3D visualization, even rough sketches can serve a good purpose as a source file. For instance, an architect may want to have a rendering simply as a proof of concept, so hyper-realistic details are not the priority; the image only needs to showcase whether a particular exterior design will blend well with the surrounding environment, among other houses in the neighborhood. The artist needs to add minor details or subtle design elements in various places to refine the sketches and make them more presentable.
- 3D models: the best source materials are 3D models of the building in question. No render is possible without a 3D model, and the 3D render freelancer or artist has to make one before the rendering begins if you don’t have any. Although this is not particularly bad news, the timeline will stretch further due to the additional workload. It may take a week (or less) to create the 3D model alone depending on the complexity.
- Materials and textures: to achieve the optimum result, exterior rendering must represent the building’s outer shell down to the tiniest details, including external wall texture and color. For example, the artist must replicate the materials in places with metal railings and wooden fences. The project brief can include specific samples of textures, colors, patterns, and materials either in image format or as links to online references to save time and effort.
A project description in the form of written instructions can be helpful too. The rendering artist will review the project brief and ask for additional source documents if needs be.
RELATED: Exterior 3D rendering costs: 13 areas impacting rates & budget
5. Clay render
Once the brief is complete, the artist starts working on the project. The first deliverable is typically a bare-boned image known as a “clay” render. The image has no colors, no textures, and no reference materials. However, it features all the main components of the exterior, as stated in the project brief.
Upon inspecting the clay render, the artist expects you to provide feedback. Your primary concerns at this point are the technical specifications like dimensions, positions, and camera angles. Complaining about the lack of colors is irrelevant. Another thing of importance is whether the image contains every object required. If no additional 3D modeling work (to make more visible objects) is necessary, the project proceeds to the next phase. Some rendering designers may offer suggestions to enhance the visuals.
6. Color proof 1
Using the clay render as the base file, the artist implements superficial details, including colors, materials, textures, and patterns. The focus now shifts to the atmosphere and environment surrounding the building. A crucial phase of the rendering process happens at this point of the workflow and involves adding lights and shadows. The types of materials and colors affect how lights behave, so you can expect to see shadows, reflections, refractions, bright spaces, and dim spots all over the image. Different objects like people, vehicles, trees, and water also come along.
RELATED: What types of 3D rendering do architectural design studios & CAD freelancers use?
After receiving this second deliverable, you may want to give more detailed feedback, asking the artist to add, remove, or replace some elements. Several revisions typically take place during this phase. When you are pleased with the result, the final render is next in line.
7. Final render
Many rendering artists apply some finishing touches to the 3D render design using photo manipulation software like Photoshop or Gimp. The objective is to improve color balance, brightness, contrast, and lens correction. This process is essentially post-production, where an artist tries to emulate the imperfections produced by real-world cameras.
Today’s standard resolution for exterior rendering is 4k, suitable for A1 printing. You can ask for a lower resolution if needed, and some artists allow for additional revisions at an extra cost.
Make the rendering workflow run quicker.
Architects usually have their exterior 3D rendering completed by outsourced service. Managing the work can be tricky for both parties, like any other outsourced task. The objective of a 3D visualization process is to create a photorealistic rendering of a building; however, there can be a difference in perspectives between the clients and the artists.
RELATED: How a 3D rendering service can help with your exterior design
Even when they are talking about the same building, each may have a specific yet contrasting idea about its final representation in digital format. The specification is identical, but the atmosphere surrounding the building may not be the same. The problem is that it comprises numerous additional details such as natural and artificial light sources, shadows, weather conditions, backgrounds, and viewing angles. It would take an elaborate discussion to align the visions of the client and the artist.
Ideally, the rendering service does everything that the architect wants. However, the insights of a render artist can give a considerable degree of improvement to the final product as envisioned by the client. Instead of going back and forth to revise the submitted rendering due to miscommunications along the process, architects and the render artist must establish a proper collaboration method to speed up the workflow. Here are some tips:
* Have a comprehensive project brief
Every architectural rendering project requires a detailed brief. The basics should cover specifications, including dimensions and general information about the building. Rough sketches can be helpful, especially if they come with annotations describing elements such as wall color, roofing materials, windows, balcony railings, and all things that should be visible on the rendered building. For an exterior rendering, the brief must also contain some types of references, for example, locations and backdrop.
RELATED: The best architectural rendering companies and 3D rendering services
Most render artists typically provide a complete list of references or source documents they need for every order. There is a requirement for you to send a 3D model of the building in question in the list. If you have it, send a file or two to show the general shape of the building exterior. The rendering artist may still take the job if you don’t have any, but with additional cost because a 3D model is a prerequisite. No rendering service is possible without one.
Incomplete source files and rudimentary project briefs can hurt the workflow, as the artist then has to work without clear parameters and well-defined goals. There is no clear boundary between what is allowed and should not be done. Therefore, the rendering process and the result lie at the mercy of the artist’s guesswork.
The artist will produce something nonetheless, but it won’t be the same as what the client has in mind. Consequently, revisions are necessary; every revision means a longer completion time. To avoid modification despite a short brief, the renderer has to ask for clarification on every aspect the client has not yet mentioned. The workflow also suffers if the client is willing to provide prompt answers.
RELATED: 3D rendering costs & 3D visualization prices for firms
* Set a reasonable deadline
Most 3D rendering artists offer multiple service packages with different completion times. The most expensive package is usually reserved for “urgent orders,” The client needs to have the rendered image ready within 24 hours or less. The extra money gives an obvious advantage of a quicker delivery, but it is best to avoid this scenario if other options are available.
Apart from the extra cost, an urgent order means the image is done in a rush. Faster completion doesn’t always translate to “quality” in the 3D visualization market. There are too many details to attend to; getting the job done within a day means asking the render artist to handle an unusually demanding workload. With that in mind, the final result has every chance of being less-than-optimal.
A render artist can probably finish a rendering task for a small rendering design within a day. For a large project with multiple rendering outputs, such as bird’s eye view, close-ups, daytime, nighttime, and several viewing angles, it is nearly impossible to get everything done within 24 hours unless, of course, the work is left to a large team of professional CG specialists with capable computing powers at their disposal.
As a general rule, an exterior 3D visualization process takes about one to two days for a small building, two to four days for a standard house, three to 15 days for a multi-story building, and at least 15 days for an urban landscape. Remember that the timeframe is for a single photorealistic rendering image only. Two or more images take more time to complete. Setting a reasonable deadline gives a chance for the artist to work out every detail just right and produce a quality render without rushing the job and requiring repeated revisions either.
* Corrections using a visual aid
Maintaining good communication with the rendering team is vital. Each time a client receives a deliverable for every milestone set, prompt feedback accelerates the workflow. A deliverable is likely presented as a digital image format that the client can edit using a simple markup tool.
Leaving comments in annotation-style writing is a preferable method of providing feedback. The client can add text or a rough sketch over the submitted image before sending it back to the artist. Such a visual aid makes communication clear and a prerequisite for a smooth rendering workflow.
A professional rendering service may even use a CRM (Customer Relationship Management) tool to manage the project and share real-time progress with clients. All deliverables and feedback are organized in the same space for effective collaboration. A CRM system makes sure that both parties have a reliable platform to communicate their needs throughout the working process.
How Cad Crowd can assist
Cad Crowd has a team of professionals that can assist you with any of your exterior 3D rendering projects. No project is too big or small for us to handle. Contact us for a free quote.
