Realistic renders needed for luxurious leather luggage. Blind
in
3D Rendering Services
held by
martyg
Last seen:
Contest Ended, Winner(s) have been selected.
-
Open
-
Choosing Finalist
-
Ended
Description:
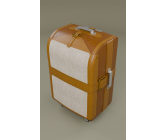
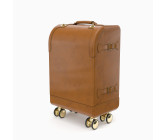
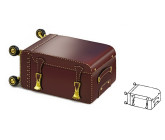
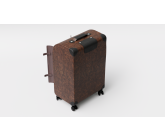
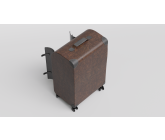
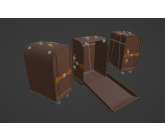
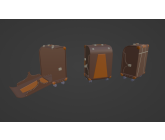
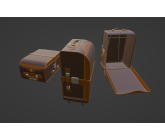
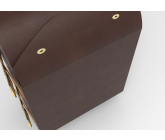
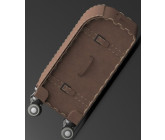
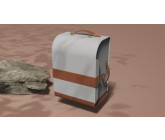
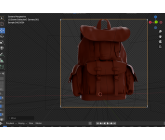
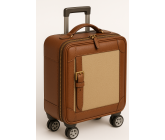
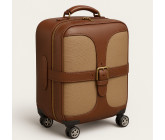
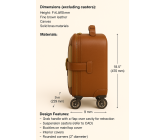
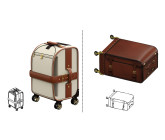
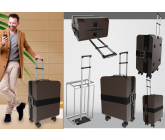
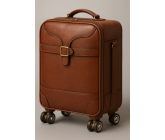
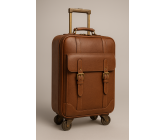
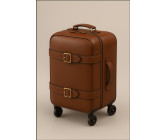
Hi! I have designed a cabin size (carry-on) rolling luggage piece. It will be made from fine leather and canvas on the outside and lined with fine materials on the inside. The buckles and other hardware will all be solid brass, with the exception of the castors which will be aluminum and rubber--and I will provide CAD files for the castors. I'm providing a plethora of my own sketches to inform you of the exact style of the bag, which must be followed closely. Not changes to the overall design of the bag are allowed, my sketches must be followed exactly and reproduced in life-like 3D rendered images. You may use your own creativity for the leather color but please do not use black. A brown leather is preferred. Stitching must be shown and look realistic. The dimensions of the bag itself are 18.5" (470mm) x 13" (330mm) x 9" (229mm). This does NOT include the height of the casters which are another 2.5" (63mm) on the height of the bag.Don't forget to view the attachment to see my sketches.
Wants:
I'm looking for renders that recreate my sketches (attached) very closely with life like realism and leather that make you want to touch it. I appreciate getting files such as pdf's and jpg's which are easy for me to view.
Don't Wants:
This luggage is not like any currently on the market so should not resemble any of it.
 Prepaid Prize
Entries
1st Winner
#28 The Rolls Royce of Luggages
by Quentin Margeot
#20 Leather Luggage rendering 1.1
by HaSwan
#12 Leather luggage V 1.0
by HaSwan
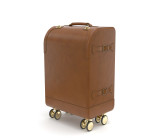
#9 Realistic renders needed for luxurious leather luggage.
by Busyb
Download Files
#15 Leather Bag
by zunairab

Download Files
#16 Work in process
by AlineaDesign
Download Files
#14 Work in process
by AlineaDesign
Download Files
#7 Blockuot_Var2
by 3DMaster
Download Files
#6 Blockuot_Var1
by 3DMaster
Download Files
#8 Blockuot_Var3
by 3DMaster
Download Files
#18 Sample Draft V1
by Adonis

Download Files
#26 Fine Leather Luggage
by johnc6741
Download Files
#25 Realistic renders needed for luxurious leather luggage.
by HawT3D
Download Files
#24 Realistic renders needed for luxurious leather luggage
by HawT3D

#19 Sample Draft V1
by Adonis

Download Files
#4 Aurum Voyager
by mohamedf7071
Declined
Download Files
#17 Heritage-Inspired Travel Gear with Signature Castor Suspension
by akshayk1757
Declined
Download Files
#1 The Marlowe 470
by marinog1
Download Files
#3 Aurum Voyager
by mohamedf7071
Declined
Download Files
#21 Realistic renders for luxurious leather luggage.
by Busyb
Download Files
#22 Carry Luggage
by kinza
Download Files
#11 Project1
by Ibraheem_Ejaz
Declined
Download Files
#10 Realistic renders needed for luxurious leather luggage.
by Johnney_7
Download Files
#27 luggage realistic render
by clintsar
Download Files
#2 The Marlowe 470
by marinog1
Download Files
Discussion
Hey MartyG, I've uploaded a sample of my work in progress, please read the details in the PDF and rate it 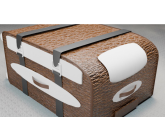

I have rated the entry's. If there is not a rating it means 1) the entry is so far from brief that no rating can be given or 2) I can't properly view the files submitted. Thanks!

Hi MartyG, Could you rate/comment the submitted designs to give us direction about it ?
Great thanks 🙏
Great thanks 🙏
Adonis, yes, either of those materials would suit it well, thanks!
busyb....renders is all I need for now but renders of each sketch side by side would be great to have!
interior*
Hey MartyG so I'm working on the interior of the bag at the moment and I'd like to know if silk or velvet would suit the it?

martyg can explain you only want renders not 3d product file of each sketch by side by side

Okay! Thanks for the quick reply.
Expect the first render in 2 days.
Expect the first render in 2 days.
You may use any of them for the rendering....I'm not fussed.
There are multiple design variations of the bag on the PDF! Which one is final?

Thanks for the clarification.
Just to let you know, I created the design using Blender — not a CAD program — so the current model is focused on the visual and concept presentation.
Let me know if you'd like any changes or if I should adjust anything based on your updated sketch.
Best regards,
Mohamed
Just to let you know, I created the design using Blender — not a CAD program — so the current model is focused on the visual and concept presentation.
Let me know if you'd like any changes or if I should adjust anything based on your updated sketch.
Best regards,
Mohamed
Prefer 2 buckles/straps on main cover to the sides. Twist locks ("two holes") or buckle on top by handle (I updated the sketch attached to brief). Don't worry about telescopic handle, just make a flap that it will be underneath. I attached the CAD wheel plans.
Hi, Nice product project. Could you precise which variant of your drawing you would see ? There's ones with two or four buckles on main cover, what's the good number ?
Is there a system to attach the main cover near the handle (We could see two holes on a drawing and none on anotther) ?
Do you have an idea of what kind of telescopic handle you want ?
Could you attach the wheels cad or plans ?
Thanks by advance,
Thomas
Is there a system to attach the main cover near the handle (We could see two holes on a drawing and none on anotther) ?
Do you have an idea of what kind of telescopic handle you want ?
Could you attach the wheels cad or plans ?
Thanks by advance,
Thomas
Hi Marty,
Thank you for this exciting opportunity. I’ve just submitted my entry “Aurum Voyager”, designed exactly according to your sketches with high realism.
Let me know if you'd like any angle variations or adjustments.
Best regards,
Mohamed Sameh
Thank you for this exciting opportunity. I’ve just submitted my entry “Aurum Voyager”, designed exactly according to your sketches with high realism.
Let me know if you'd like any angle variations or adjustments.
Best regards,
Mohamed Sameh

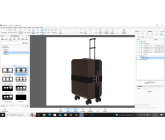
Thank you for sharing your detailed sketches and design vision. I followed them closely to create this realistic 3D render using Fusion 360. The modeling captures the precise dimensions, stitching details, and brass hardware exactly as described. I applied a warm brown leather texture to reflect your preferred tone, aiming for a refined and tactile look. Please feel free to share any feedback or changes—I’m happy to adjust details to match your expectations perfectly.
This render was created using professional-grade tools to ensure lifelike realism and accuracy. The model was developed with precision Fusion 360 software, and the materials—like leather, brass, and canvas—were textured and rendered using high-end rendering tools like KeyShot and Substance Painter. Every detail, from stitching to castors, was carefully crafted to reflect your sketches exactly and give the product a premium, tactile feel. I’m happy to adjust colors or materials if you'd like to explore further variations
Thank you for the detailed sketches and clear direction. I’ve closely followed your design and created a high-quality 3D render that matches your vision. The brown leather was chosen to reflect a warm, elegant tone, with realistic stitching and brass details. Please let me know if you’d like to see any adjustments or different leather tones. I’m happy to fine-tune it to your exact preferences. Looking forward to your feedback! Marino
Similar Contests on Cad Crowd
Air Door Actuator
I am seeking someone to create (1) 3D STP .stp file for the entire external configuration of an automotive AC air door actuators. I don't need the internals, only the external. Similar AC Air Door Actuators already completed will be considered.
Home won a CAD Crowd contest: Needs Finishing of the REAR and ADJUST MOLDING detail on the FRONT exterior.
I have a 3D render and CAD Files that won a contest on CAD Crowd that we love. We have a few more details to finish on the REAR & FRONT.
Custom Personal Care/Shampoo Bottle
Looking for a unique custom design bottle for our new business. Inspiration should be the Bath & Body Works Foaming Hand Soap Bottles (Link below). It needs to look like a product from a high-end fashion label. A signature element of the bottle should be our logo embossed up the side of the bottle. This should be a stand out feature. We are looking to be able to scale the design to different size bottles 150ml, 300ml, 600ml. Also looking for the bottle to have the option of interchangeable dispenser tops- caps, pumps, and foaming pump.
https://www.bathandbodyworks.com/c/hand-soaps/foaming-hand-soap
Piled Raft Footing
I need a single 3D or 2D rendering of a "piled-raft" foundation footing. I describe how to make it in a series of 10 steps (below) but reader will benefit if they can see it visually somehow. The illustration should be in black and white only, Gray shading is permissible. Standard architectural fill patterns for concrete, foam, soils etc. are OK. The final figure is expected to be published in a cabin-building book, with due credit to illustrator.
The construction description is below. Any questions, please ask for clarification if something is unclear!
Below are construction details for a piled-raft footing that may be suitable in locations where hand-digging holes to the frost line is made difficult by rocks, roots, or dense, compacted till. The pad footing is linked to driven pin pilings that extend downward to high weight-bearing soil. The friction with the pin pilings adds settling resistance to the pad. The footing form itself is built of XPS foam, which remains an integral part of the footing insulating against cold penetration from above.
Materials per footing:
XPS foam insulation (blue or pink) 1 sheet 2’x 8’ x 2”
Crack-resistant fiber-reinforced concrete mix (1 80# bag)
½” x 12” concrete anchor bolt
5/8” x 20’ rebar (number depends on driven depth)
Construction adhesive (1 tube)
Ground-marking paint (1 spray can)
Directions:
1) Excavate a square hole 3’x 3’ and ~12” deep. Pile excavated soil on a tarp for later use as backfill. Leave the bottom of this excavation level and soil on bottom undisturbed (important!).
2) Cut four pieces of XPS foam 2’x2’ in size. On 3, find the center, and cut a circular hole with 9” radius (18” diameter) using jig saw or drywall saw. Bond these together with foam-compatible adhesive along the circular cut edge. On the fourth piece of foam, find the center and cut a circular hole with 4” radius (8” diameter). Bond this piece to top of the other three.
3) Lay the XPS form flat on bottom of excavation exactly where the footing/pier will be. Reach inside and spray paint the ground within the form. Then remove the XPS foam form and set aside.
4) Within the painted circle, drive an 8’ length of rebar into the ground as far as it will go, or until just 8” protrudes, whichever comes first. For ease, drive this with a hand-held fence post driver and finish with hand sledge. Cut off protruding rebar 8” above ground (a Milwaukee 12V cordless subcompact bandsaw is an excellent tool for this).
5) Continue in this fashion until you have driven 6 rebar pins, well-spaced, into the footing area, but none closer than 2” to the painted outline of the footing.
6) Using a rebar bender tool, bend the protruding length of each piece of rebar to a ~ 90-degree angle, 3 or 4 inches above the ground. Keep all bends within the footing outline. These bends will lock the rebar into the concrete raft when the footing is poured.
7) Place the previously constructed XPS form on the painted ground surface, enclosing all of the driven pin piles. Mix fiber-reinforced concrete to specifications. Weight form down with cinderblock or large stones and pour mix until it is flush with top of the form.
8) In the center of the 8” diameter hole, insert 12” anchor bolt, pushing through the wet concrete until it hits the ground, leaving 4” exposed. Ensure it’s centered and plumb. Cover exposed concrete with plastic and let the footing cure 72 hours.
9). Cover the form with dirt excavated originally. Grade to drain away from the top of the footing. Seed, and cover with straw until vegetation is established. (Omit this step from drawing....).
10) An 10" diameter round wooden pier will be set on top of this footing. The protruding bolt in the footing will insert in a hole drilled in bottom center of the pier.
Blocks and Pulleys, and Strings…. Oh My!
This is a new kid’s toy that uses strings with blocks, pulleys, motors, trolley, carriage, hooks, and claws. The components can be attached with temporary double-sided tape, to walls, ceilings, and floor areas (horizontal and vertical surfaces. and inside and outside corners, window and door frames) in a room(s).
Adonis
Designer